Saturday, 31 March 2012

TFG (Transport for Goodies)

I always try to bring something baked to any sort of social gathering. However carrying everything in my limited collection of cake tins and tupperware proves to be problematic.

Saw someone had posted about this fantastic cupcake carrier on another baking page and you can get your own from Asda for £6! Problem solved.


Saturday, 24 March 2012

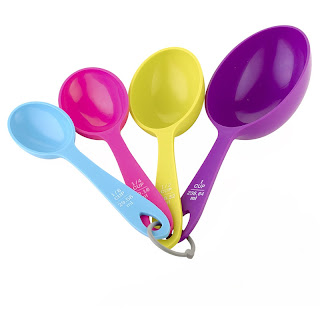
Add colour to your kitchen: Colourworks Measuring Cups

I often find that American baking blogs can offer up some fantastic recipes. However, the major issue is decoding their measuring system. With everything listed in 'cups' it means that instead of leaping straight into making whatever delicacy I've found, I have to spend ages converting all the measurements.

My mother must have been having the same problem as she sent me a link to these beauties from Lakeland. They make measuring easy and brighten up your kitchen!

Great piece of kit for £5.99


£5.99 from the Lakeland website or in store.

Saturday, 17 March 2012

Kitchen Design: Bistro Board

I'm someone who loves my flat to be full of little knick knacks and trinkets. I think the little touches are what make a difference to a home. And I'm always looking out for something unusual and reasonably priced to add to my collection.

I only left university in June 2010 so am still in the process of putting together my 'home'. I live with my other half and his 'stuff' focuses more on games consoles and computer parts. So I've been working on making the flat more homely.

I love browsing craft fairs and whilst working in a high street accessories store temporarily over Christmas I met a colleague who has her own small crafts business. Whilst she primarily sells via local craft fairs she's building an online presence for her company Bumbleblue.

One of the items she's selling which I've fallen a little in love with is this recipe blackboard, similar to what you'd find in a bistro.


Perfect for writing up recipes or food related messages to hang in your kitchen and a steal for £6!

Check out Bumbleblue!

Saturday, 10 March 2012

Kitchen Cuties: Retro Aprons

Now aprons are a necessity for any domestic goddess who wants to keep her outfit looking fabulous whilst whipping up something sweet. But who says function can't join with fashion?

Now I love browsing Etsy.com. For those of you not familiar with it, it's an online marketplace for small businesses and individuals to sell their crafts and products. It's a great way to find a one of a kind item. I did a search for retro aprons and found a fantastic seller named Rosie Ann.

Retro apron, Cath Kidston-esque non? - £22

Half apron, 50's style - £14

Check her out and browse other sellers on Etsy for a great find!

Saturday, 3 March 2012

Baking Drawer Must Have: Colour for Cakes

Since discovering a love of baking, my birthday and Christmas presents seem to have taken on a distinct theme. My designated baking drawer in our kitchen is getting fuller every time there's a special occasion.

One of the recent additions was a Christmas present from one of my sisters. Wilton food colouring gels. I've previously used the Dr Oetker liquid colourings you can buy in supermarkets but sometimes have to use a seemingly massive amount to get the colour I want.

The gels come in small pots resembling paint pots. A set of 8 colours will set you back somewhere between £14 and £18. Shop around online and see what price you can find.

When making the rainbow cake I posted about a couple of weeks ago I used the gels, having read that they would give a much more vibrant colour than their liquid counterparts. I have to admit I was very impressed. A small amount produced a bright and rich colour. I'm someone who likes to use colourful frostings so these suit me perfectly. Highly recommended!


Wilton 8 Icing Colour Gels


Saturday, 25 February 2012

Easy Peasy Quick Cook Cupcakes

Recently we had my sister and her boyfriend to stay with us. We've not really had any time to get to know him and so they visited for a weekend. Great time all round. However my other half had gone to pick them up from the station and I realised that - shock horror - I had no baked goods to offer them!

So I went to my 'go to' cupcake recipe. Simple but delicious vanilla cupcakes. And to avoid having to spend time whipping up frosting I used an old trick of my mothers. Using chocolate spread. This time I topped them with crushed Maltesers which I had left from a Christmas gift box. But you could use anything. Another way to make them a little more exciting is to use a variation on the chocolate spread. My other half brought some home from Sainsbury's the other day which has popping candy in it. A great treat for the kid in you!


Easy Peasy!


You will need:
  • 80g softened unsalted butter
  • 280g caster sugar
  • 240g plain flour
  • 1tbsp baking powder
  • 1/4tsp salt
  • 240ml milk
  • 1/2tsp vanilla essence
  • 2 large eggs
  • Chocolate spread (whatever brand or variety you have available)
  • Something to decorate with
To make: 

Preheat the oven to 190 degrees and line a muffin tin with muffin cases

Use a handheld whisk or a mixer with a paddle attachment to beat together the butter, sugar, flour, baking powder and salt until all ingredients are well mixed. When the mixture has a sandy consistency then you're done.

Separately, mix together the milk,vanilla essence and eggs in a jug. Add to the dry mix with the mixer set on slow speed. Once all is added, set mixer to medium speed until batter is smooth.

Spoon the mixture into the cases, no more than two thirds full. This quantity should make between 12 and 16 cupcakes.

Bake for 18-20 minutes. Leave to cool slightly before removing from the tin and until fully cool before icing.

Use a knife or icing spatula to spread on chocolate spread and top with your choice!

Saturday, 18 February 2012

RAINBOW CAKE!

I've been wanting to make a rainbow cake forever and finally managed one this week! It'll take a little while to make it but it's worth it just for the 'wow factor!'

Just. Fabulous!

You will need:

4 eggs
8oz self-raising flour
8oz caster sugar
8oz margarine

For the icing:

300g icing sugar
50g margarine
125g cream cheese

To make:

Preheat the oven to 160 degrees

Mix the eggs, self-raising flour, caster sugar and margarine together to create the sponge mix

Divide into six equal portions and mix with your food colourings/gels

Grease and line six sandwich tins (if you have that many! I did it in two rounds of three tins) with coloured mixes

Bake for around 20-25 minutes, keeping an eye on the cakes

Leave in the tins to cool for a while before turning them out onto wire racks

Once they're cool, layer the cakes and secure with the cream cheese icing

Top the top layer with icing, and, if you have enough, the sides too!


Monday, 23 January 2012

Somerset Stew and Cheddar and Parsley Mash

We're on a health kick here! And still going as February draws nearer. We just had this for dinner and as well as being super tasty, it left us feeling like we'd eaten healthily too. Which is always a good feeling to accompany being full! Give this a try, it's a nice winter warmer.


Not the most artistic photo, but trust me it's TASTY!

You will need:
  • 1tbsp olive oil
  • 1 onion, finely chopped
  • 1 garlic clove, finely chopped
  • 1 large carrot, finely chopped
  • 1 leek, chopped
  • 1tbsp tomato puree
  • 400g tin chopped tomatoes
  • 200g tin of butter beans, drained
  • 400g tin flageolet beans, drained
  • 200ml dry cider
  • 250ml vegetable stock
  • Sprigs of thyme, leaves only
For the cheddar and parsley mash
  • 850g potatoes
  • Splash of milk
  • 25g butter
  • 75g cheddar cheese
  • Chopped parsley, handful

To make

Heat your oil in a large pan and add the carrot, onion, garlic and leek

Fry until soft

Add the tomato puree, chopped tomatoes, butter beans, flageolet beans, cider, vegetable stock, thyme and simmer for 15-20 mins until the stew thickens and the vegetables are tender

For the mash: peel the potatoes and cut into chunks. Boil in salted water for 15 mins

Drain, put back in the pan and mash with the milk, butter, cheese and parsley

Season and (if you like) decorate with lumps of butter and place under the grill for a golden and crisp finish

Thursday, 5 January 2012

Snickerdoodle anyone?

So I've heard snickerdoodles mentioned in American books and on tv and always wondered what they are. They have such a great name! So when I found a recipe in one of my baking books the other day I had to try them.
For those non-Americans reading this, they're cinnamon biscuits and sooo good!

Here's how to make them at home.

Snickerdoodle!

You will need

For the dough
  • 60g unsalted butter
  • 160g caster sugar
  • 1/4tsp vanilla essence
  • 1 large egg
  • 240g plain flour
  • 3/4tsp cream of tartar
  • 1/2tsp bicarbonate of soda
  • 1/8tsp salt
  • 1/4tsp cinnamon
For the coating
  • 1 1/2tbsp caster sugar
  • 1tbsp ground cinnamon
To make

Using a hand-held electric whisk or a freestanding mixer, cream the butter, sugar and vanilla essence together

Once the mixture is fluffy, add the egg, making sure to scrape all the mixture from the sides of bowl to incorporate

Sift the flour, cream of tartar, bicarb, salt and cinnamon together in a separate bowl and add to the creamed butter and sugar in two or three portions

Mix well until the dough forms a smooth bowl

Place the dough in a bowl, cover it with cling film and place in the fridge to cool and rest. Leave it for approximately 40minutes

While the dough is resting, preheat the oven to 170°c and line two or three baking sheets with baking parchment

Mix the cinnamon and sugar together for the coating

Once the dough is ready, break off walnut sized pieces, roll them into balls and coat in the cinnamon sugar

Place the dough balls on to the prepared baking sheets, about five or six per sheet and making sure they're well spaced to allow for expansion whilst baking

Pop them in the oven and bake for 10-13 minutes or until the cookies are a light golden colour

Allow them to cool and set on the sheets for a few minutes before putting them onto a wire rack

Monday, 2 January 2012

Before the diet starts: Red Velvet Cupcakes

Apologies for the lack of posts these last few weeks! I hope that you all have had a wonderful Christmas and New Year. I also hope that there were a lot of lovely things to eat and drink.

We (the other half and I) spent Christmas with my family in Wales. None of us really like Christmas pudding so I offered to bring something baked that we could all have with a post lunch cup of tea. I thought it was probably best to do something I'd made before so did a batch of Red Velvet Cupcakes. A bit of indulgence and a chance to use my edible red glitter!


Fantastic colour mixture!

Beautiful colour sponge!

And the finishing touch, edible glitter!

You will need:


For the cupcakes

  • 120g unsalted butter
  • 300g caster sugar
  • 2 large eggs
  • 20g cocoa powder
  • 40ml red food colouring (I recommend Silver Spoon or Dr Oetker)
  • 1tsp vanilla essence
  • 300g plain flour
  • 1tsp salt
  • 240ml buttermilk
  • 1tbsp white wine vinegar
  • 1tsp bicarbonate of soda
For the icing
  • 100g unsalted butter
  • 600g icing sugar
  • 250g full-fat cream cheese
  • To decorate: edible glitter, coloured sprinkles...anything you'd like!
To make

Preheat the oven to 190°c and line a muffin tin with cases

Using a hand-held electric whisk or a freestanding mixer, cream the butter and sugar together until you reach a fluffy consistency. Break in the eggs one at a time. Beat thoroughly after each egg and make sure to mix in the mixture from the sides of the bowl.

In a small separate bowl, blend together the cocoa powder, food colouring and vanilla essence until you get a paste. Then add the paste to the mixture, mixing thoroughly until everything is incorporated.

Sift the flour and salt together in a separate bowl and add to the cake mixture in two portions, alternating with the buttermilk. Ensure you mix thoroughly after each addition. 

Finally, mix together the vinegar and bicarb (watch for the fizz!) and add it to the mixture and do a final mix (ensure you get in all the mixture from the sides of the bowl).

Spoon the batter into the paper cases so that they are two thirds full. The recipe makes 12-16 cupcakes. 

Place in the oven and bake for 18-20 minutes. Allow the cupcakes to cool for a short while in the tin, cool on a wire rack before you ice them.

To make the icing:

Using your whisk or mixer, beat together the butter and icing sugar until there are no big lumps of butter left. Add the cream cheese and mix on a slow speed until well blended. Then turn to medium speed and beat until light and fluffy.

Cover all but one of the cupcakes with 2 tbsps of the icing, smooth down with a palette knife and make a swirl in the middle for a decorative finish.

Place the remaining cupcake in a food processor and blitz until you have fine crumbs. Sprinkle the frosted cupcakes with the red crumbs. Or use sprinkles. Or glitter. Or whatever you prefer!