So as you're all well aware, the online baking community is massive! Every day I find a new blog with new delights. However I'm happy to tell you all that I'm honored to introduce Shortcakes' first ever guest post.
Of Cookies and Cakes is a new blog run by one of my all time favourite people, my effortlessly beautiful, stylish and talented best friend Korlin. She shares here her guide to creating a fabulous (yet easy to make) gift. If you love this as much as I do, then check out her blog here for impressive bakes and home-made goodies.
Of Cookies and Cakes is a new blog run by one of my all time favourite people, my effortlessly beautiful, stylish and talented best friend Korlin. She shares here her guide to creating a fabulous (yet easy to make) gift. If you love this as much as I do, then check out her blog here for impressive bakes and home-made goodies.
 |
| Isn't she lovely? |
---------------------------------------------
Easy hostess/host gift: self-made chilli vinegar or chilli oil
 |
| Self-made chilli vinegar |
Ok, so this one isn't about baking and doesn't involve an oven in any kind. But, meh, who cares.
I was invited for dinner to a friend's place and usually I don't like
turning up to stuff like that empty-handed, especially if I suspect the
person may have put some effort in having me over (she did, it was
delicious and a lovely evening - so I was very glad I had prepared
something for her).
So this time I turned to Martha for inspiration. I like looking at
Martha Stewart's website, I like the style and sometimes they have nice
ideas. Yes, sometimes I like to browse the crafts pages, the wedding
etiquette pages, the hostess gifts section... Does that make me older
than I am? Well, I always suspected that I am a little bit 1950s
housewife on the inside.
Anyhow. So. I decided on making chili vinegar, simply because it looked
nice, I like spicy stuff myself and, most importantly, I figured I could
get the needed ingredients on such short notice (I decided upon a
hostess gift some 4 or 5 hours before I was supposed to be there).
It is quite simple. You'll find the original recipe here - it only talks about infusing vinegar but I suspect that chili-infused oil might be just as big a hit.

In this case (and I'm sure it depends on the different chillis used, etc.), surprisingly, the yellow ones were much, much hotter.
I needed quite a bit of milk to get over it.


What you need:
- pretty bottles
- enough white vinegar, rice vingar or oil to fill the bottles
- red, yellow and green chilis - Martha says 20 per half litre, but I used much less, just as many as I could fit in each bottle (six big red ones for the bigger bottle and 4 smaller yellow ones for the much smaller bottle - I think even the bigger one was less than half a litre) (I couldn't find any green ones)
- decoration as desired
 | ||
| Oh-oh, careful, hot! ...not just on your tongue, but also on your eyes, nose, and other sensitive body parts. |
- and, secret tip: one-way gloves! Otherwise: ouch. Trust me.
 |
| There you go. Much better. |
How to do it:
1. Sterilize the bottles by placing them into hot water for ten minutes (make sure the water goes inside the bottles).
2. Contrarily to Martha, I decided to cut the chillis in halves, along their length. Ok, not so much "decided" as "was forced to", since otherwise they wouldn't have fit through the bottle neck. Plus I figured that the infusion would get much hotter this way, because of the sliced cells and the seeds.
3. Once all your chillis are safe and snug in the bottles, bring the vinegar to just boiling, then use a funnel to fill the hot liquid into the bottles.
4. Let cool and cork the bottles. Wait a few days for the flavour and spiciness to unfold. Not sure how long this will keep, but probably quite a while.
So, now the question that is burning (tehehe... burning... pun!) under everyone's nails, I'm sure. Which peppers are hotter - red or yellow? I decided to sacrifice myself in a self-experiment in order to be able to warn my friends who I would present this later to.
In this case (and I'm sure it depends on the different chillis used, etc.), surprisingly, the yellow ones were much, much hotter.
I needed quite a bit of milk to get over it.
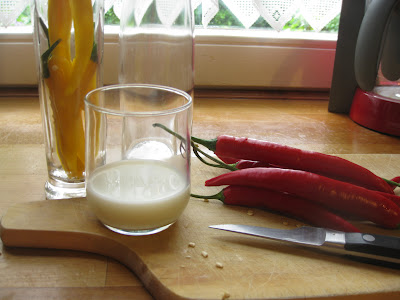 |
| Always go for milk or yogurt (or bread) to fit nasty spice heat pain. Why? I've heard it's because the stuff that makes chili taste hot is lipophilic, i.e. soluble in fat, not in water. This means that water cannot "wash the pain away", the stuff that hurts stays put. Something that contains fat does a much better job. |
If you've tried infusing things, I'm interested to hear your comments - I think I will go garlic crazy for my next infusion...
Next time there will be some baking, though. Promise.
Next time there will be some baking, though. Promise.


